Using Skype from VFP
Autors: Josip Zohil, Prisojna pot 8, 6000 Koper, Slovenija (
Ivan Stepanovic, Ateks, B.Jovanovica 9, Belgrade, Serbia and Montenegro
(istepanovic@ateksbg.com)
Summary
Many of the programs you create with FoxPro need to interact with some kind of messages.
This article will teach you how the VFP programs you create can use Skype. It shows
in a friendly format how to develop a simple client to automate communication over
Internet. The examples in this article can be directly tested, by simply copying
and pasting the entire code (in this article) in any FoxPro project.
Introduction
In many cases users of Visual Foxpro (VFP) application need to communicate
(text, voice, video) over Internet. VFP
itself has limited ability to satisfy
those needs. There are software products available that let you do this
automatically from within a VFP application. The one that we opted for is
Skype. Like using emails, Excel or Word Automation, you can use the Skype API
or indirectly the COM wrapper ActiveS to automate communication over Internet.
In this document two sample shows you how to use the ActiveS COM and the Skype
functionality, to enable your VFP application with VoIP (Voice over Internet
Protocol) and other messages handling.
Step by step guide
1. Download and install Skype.
2. Download and install ActivS COM.
3. Create a new VFP project or use an old one. Add a new sample form to the project. In the properties window change a form name to skypem and its caption to Using Skype from VFP.
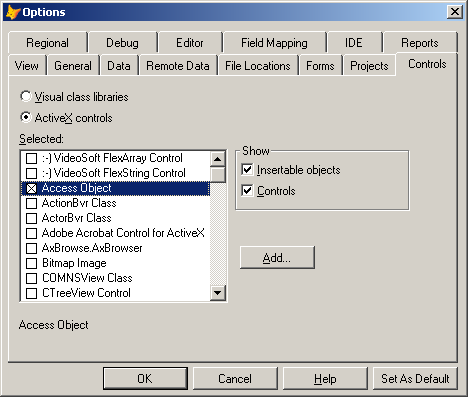
Figure 1. Selecting the Access object (ActiveS
control)
4. In Tools menu select Options, than select Controls, click ActiveX, check the Access Object (Figure 1) and click Ok.
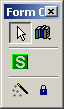
Figure 2. FormControls Toolbox and the ActiveS control
5. Select
the FormControls Toolbox (Figure 2) , then View Classes and change the
setting to ActiveX Controls. Select the ActiveS control (»S« with green
background) and drop it in the form. In the sample form rename the
olecontrol as objAccess.
6. The
application will ask you if another
program wants to use Skype. Click Allow this program to use Skype and than
click OK.
7. Drop
a textbox into the form and change its name to txtAppName.
8. Save the sample form with the name Skypem. In the init event of the form add this code:
if (thisform.objAccess==null)
MessageBox("Cann't create object access ")
Return
Else
thisform.objAccess.Connect()
*The name off this application is Skypem
thisform.txtAppName.value="Skypem"
endif
9. Add
a label control to the form and name it lbStatus. Adjust the lbStatus controls
to appropriate size.
10. In the objAccess control open the
APIStatusChanged method (event) and add this code:
LPARAMETERS status
thisform.lbStatus.Caption =STR(status,5)+' '
m_statusAPI = status
if(status == 0)
*status=0 - Attachment Success
If not thisform.openAPP()
*cann't open application
return
endif
* to be used later
*thisform.addusers
Endif
11. Add a new method to the form. Name it openApp. Put this code in :
try
m_objApp = thisform.objAccess.OpenApplication(thisform.txtAppName.Value) thisform.lbStatus.Caption =thisform.lbStatus.Caption+"Api Attachment Success. "
catch
MessageBox( "Unable to create Application object")
return .f.
endtry
return .t.
12. Now you can test the form. Save the sample form and run it.
13. Drop a listbox control into the form. Name it lvUsers. Add also a label control and rename it to txtSelectedContact. Add a new method to the sample form. Name it addUsers. Put this code in it:
try
thisform.lvUsers.Clear()
for i=1 to thisform.objAccess.getFriendList.Count
objItem=thisform.objAccess.getFriendList.Item(i).Handle
thisform.lvUsers.AddItem(objItem)
endfor
thisform.txtSelectedContact.Caption =thisform.lvUsers.ListItem(1)
catch
MessageBox( "Unable to retrieve user list.")
endtry
14. In the control Skypem open the method APIStatusChanged and remove the asterix from the line *thisform.addusers.
15. Save the form and run it.
16. Add this code to the InteractiveChange method of the ivUsers listbox:
if (thisform.lvUsers.ListIndex>=0)
thisform.txtSelectedContact.Caption = thisform.lvUsers.ListItem(thisform.lvUsers.ListIndex)
endif
17. Drop a button into the sample form. Name it PhoneCall, and its caption PhoneCall. In the click method of this button add this code:
local user,call,rawMessage,message
call=""
user =thisform.txtSelectedContact.Caption
if (len(trim(user))>0)
call=thisform.objAccess.PlaceCall(user)
if (call.ID != null)
rawMessage = "SET CALL {0} STATUS INPROGRESS"
thisform.objAccess.SendCommand(rawMessage,call.ID)
endif
endif
18. Drop a button into the sample form.Name it stop, and its caption Stop Call. In the Click method of the new button add this code:
LOCAL lcount
lcount=thisform.objAccess.getActiveCallList.Count
if lcount>0
for i=1 to lcount
thisform.objAccess.getActiveCallList.Item(i).Status=7
endfor
MessageBox("Stop call")
endif
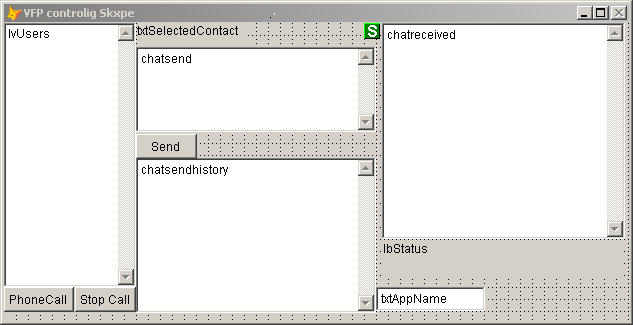
Figure 3. Sample VFP form that enable VFP application to control Skype
19. Drop a editbox into the form. Name it chatsend. Drop another editbox into the form. Name it chathistory. Add a button to the form. Name it send and its caption Send (Figure 3). In the click event of the button send add this code:
LOCAL mes as string
if len(trim(thisform.chatSEND.Value))>0 AND ; len(trim(thisform.txtSelectedContact.Caption))>0
mes=thisform.txtSelectedContact.Caption
thisform.objAccess.SendMessageA(mes , thisform.chatSEND.Value)
thisform.chatsendhistory.value =thisform.chatsendhistory.value
+ ;
"--------------";
+thisform.txtSelectedContact.Caption
+ ": "+TTOC(dateTIME())+" ";
+thisform.chaTSEND.Value+"-----"
thisform.chaTSEND.Value=""
thisform.Refresh()
endif
20. Add this code to the method ChatMessageReceived in the control objAccess :
if (skypechatmessage.Status=3 )
*3-"chatMsgRead"
thisform.chatreceived.value=thisform.chatreceived.value+ ""+; skypechatmessage.MessageFrom.Handle; + " says at ; ("+ttoc(skypechatmessage.Timestamp)+"): "+ ;
skypechatmessage.Body
MessageBox("A new Skype message from "+;
skypechatmessage.MessageFrom.Handle+" "+;
skypechatmessage.MessageFrom.FullName)
endif
21. Save the form and run it. From the sample form you can access some Skype functions. In the download code is a second sample form and a class where you can find additional techniques to control Skype from VFP.
Conclusion
One of the most
popular topic in messaging was the sending and receiving of emails
automatically from within a VFP application. Now VFP developers can also
automate telephony (VOIP) and instant text messaging over Internet.
The sample in this article demonstrates the ease of use of VFP to build your own
personalized messenger. As you can see, accessing Skype from
VFP can be as easy as any other type of automation. The download contains
also a sample with more code. With this code it
should be easy to build your own instant messaging client that is able to
access Skype.
Download code
Click here to
download the code that is discussed in this article. The code contains two
samples on using Skype from VFP. Unzip the files in the root directory of your
test application and run those forms.
Revisited: 20th April 2006